How to Maintain Radiators for Efficient Heating in 2025
Radiators work hard behind the scenes, keeping your home cosy during the coldest months. It might surprise you to learn that bleeding radiators can improve heating efficiency by up to 15 percent and reduce your energy bills. Most people worry about complex repairs, but radiator maintenance is often much simpler than it seems and knowing the right steps can make a world of difference.
Table of Contents
- Step 1: Gather Necessary Tools And Materials
- Step 2: Turn Off Heating And Allow Radiators To Cool
- Step 3: Bleed Radiators To Remove Air Trapped Inside
- Step 4: Check For Leaks And Repair Any Issues
- Step 5: Clean Radiators And Remove Dust Buildup
- Step 6: Test Radiator Performance And Adjust Settings
Quick Summary
| Key Point | Explanation |
|---|---|
| 1. Gather essential tools for maintenance | Collect tools like a radiator bleed key, digital thermometer, and screwdrivers to prepare for radiator upkeep. |
| 2. Turn off heating before maintenance | Switch off your heating system and allow radiators to cool for 30-45 minutes to ensure safe working conditions. |
| 3. Bleed radiators to release trapped air | Performing a systematic bleeding process removes air pockets, enhancing heating efficiency and reducing energy costs. |
| 4. Check for leaks during inspection | Regularly inspect for moisture and rust around valves and connections to prevent damage and maintain system performance. |
| 5. Test performance after maintenance | Restart heating and monitor for even heat distribution, unusual sounds, and proper temperature to ensure effective radiator function. |
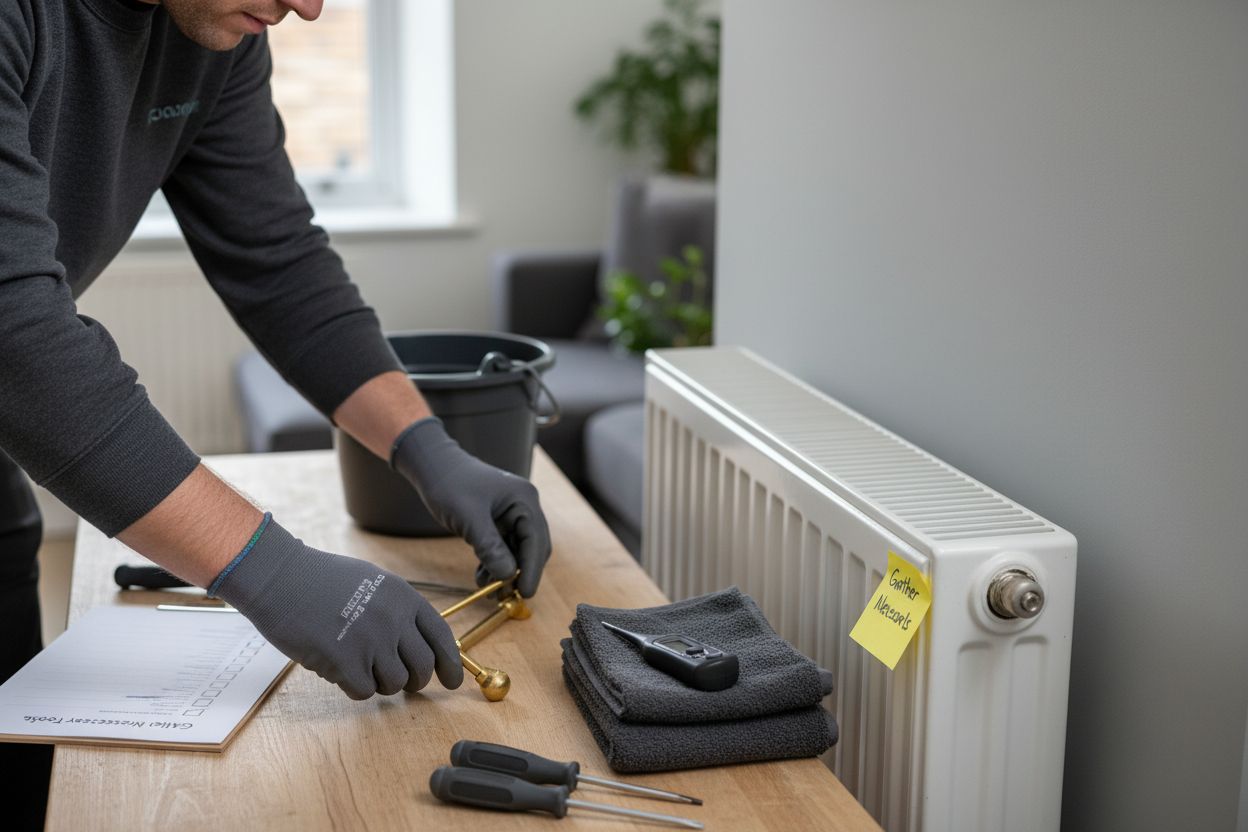
Step 1: Gather Necessary Tools and Materials
Preparing to maintain your radiators requires strategic planning and the right equipment. Professional heating maintenance demands precision and careful preparation, ensuring you can address potential issues efficiently and safely. Before diving into the technical aspects of radiator upkeep, collecting the appropriate tools and materials will set the foundation for a successful maintenance process.
Essential Tools for Radiator Maintenance
Your toolkit will be crucial in navigating the maintenance journey. You will need specific instruments that enable thorough inspection and potential repairs. A comprehensive radiator maintenance toolkit typically includes:
- Adjustable radiator bleed key
- Digital thermometer
- Protective work gloves
- Large towel or absorbent cloth
- Bucket or container for water collection
- Flathead and Phillips head screwdrivers
- Adjustable wrench
These tools provide the fundamental equipment necessary to diagnose and address potential radiator performance issues. Each instrument serves a specific purpose in the maintenance workflow, enabling homeowners to perform comprehensive checks and minor repairs.
Beyond physical tools, safety preparation is equally critical. Ensure you have appropriate protective clothing, including sturdy work gloves and clothing you do not mind getting potentially dirty. Work in a well-ventilated area with adequate lighting, which allows for precise examination of your radiator’s condition.
Before commencing any maintenance, turn off your central heating system. This precautionary step prevents potential scalding and allows radiator components to cool down sufficiently. Waiting approximately 30 minutes ensures safe working temperatures and minimises risk of accidental burns or steam-related injuries.
Additionally, have some clean cloths or paper towels available for wiping surfaces and managing any water spillage during the maintenance process. A small container or bucket positioned strategically can catch any water released during bleeding or cleaning procedures, maintaining a tidy workspace.
By methodically gathering these tools and preparing your workspace, you establish a solid foundation for effective radiator maintenance.
Below is a table summarising the essential tools and materials required for effective radiator maintenance, along with their main purposes.
| Tool/Material | Purpose |
|---|---|
| Adjustable radiator bleed key | Releases trapped air from radiators |
| Digital thermometer | Measures radiator surface temperature |
| Protective work gloves | Ensures safety when handling hot or dirty parts |
| Large towel or absorbent cloth | Catches drips and protects flooring |
| Bucket or container | Collects water released during bleeding |
| Flathead/Phillips screwdriver | Removes or tightens radiator fittings |
| Adjustable wrench | Tightens valves and connections |
| Clean cloths/paper towels | Wipes surfaces and manages spills |
Step 2: Turn Off Heating and Allow Radiators to Cool
Safety and systematic preparation are paramount when maintaining radiators, making the cooling process a critical preliminary step. Turning off the heating system and allowing radiators to cool completely prevents potential scalding risks and creates a stable environment for thorough inspection and maintenance. Read more about common radiator problems and safety considerations.
Systematic Heating System Shutdown
Begin by locating your central heating control panel or thermostat. Most modern systems have a clear shutdown mechanism, typically involving pressing a specific button or switching the system to an “off” position. For older systems, you might need to manually turn off the boiler using its dedicated power switch. Ensure you understand your specific heating system’s shutdown protocol to avoid unnecessary complications.
Once the heating is switched off, patience becomes your most important tool. Radiators retain significant heat even after the system is deactivated, and rushing the cooling process can lead to potential injuries. Allow approximately 30 to 45 minutes for complete cooling. During this waiting period, avoid touching radiator surfaces directly and keep children and pets away from the area.
Verifying Safe Working Temperature
To confirm the radiators have reached a safe working temperature, conduct a careful temperature check. Use the back of your hand to test the radiator surface gently. The metal should feel only slightly warm or at room temperature. If the surface still feels hot to the touch, continue waiting and recheck periodically.
While waiting for cooling, use this time to prepare your workspace. Lay out your previously gathered tools, position your collection bucket, and spread protective cloths or towels around the work area. This preparation ensures a smooth transition into the next maintenance steps.
Additional precautions include ensuring proper ventilation in the room. Open windows slightly to help dissipate residual heat and create a comfortable working environment. Remember that different radiator sizes and materials might cool at slightly varying rates, so exercise consistent caution throughout the process.
By methodically turning off the heating and allowing radiators to cool completely, you establish a safe foundation for thorough maintenance. This deliberate approach minimises risks and sets the stage for effective radiator care.
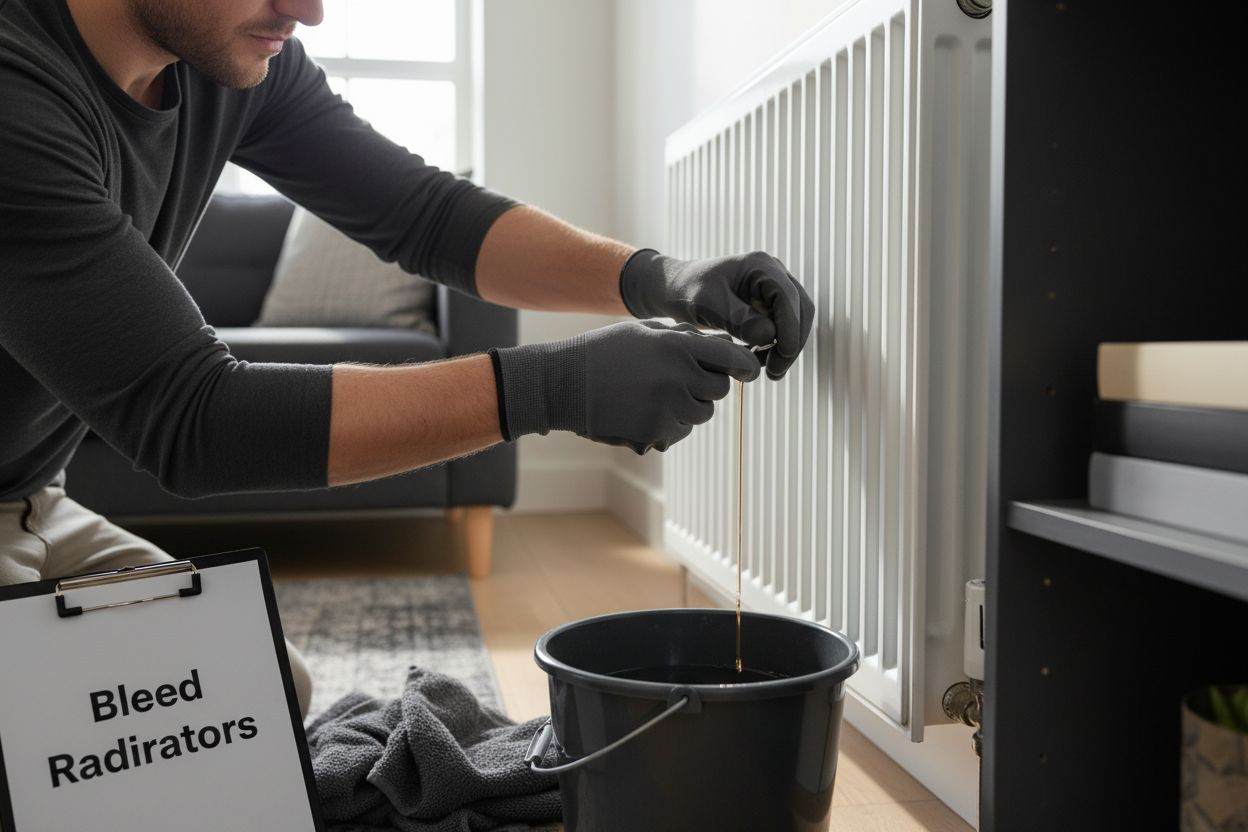
Step 3: Bleed Radiators to Remove Air Trapped Inside
Removing trapped air from radiators is a crucial maintenance step that significantly improves heating efficiency and system performance. Air pockets within radiator systems can drastically reduce heat distribution, causing uneven warming and increased energy consumption. Learn more about balancing heating systems for optimal comfort.
Understanding Air Trapped in Radiators
Air accumulation occurs naturally in heating systems over time, creating barriers that prevent hot water from circulating effectively. These trapped air bubbles create cold spots in radiators, reducing their heating capacity and making your system work harder to maintain desired temperatures. The bleeding process releases these air pockets, restoring full functionality to your heating infrastructure.
Step-by-Step Bleeding Process
Begin by positioning your prepared towel or cloth beneath the radiator bleed valve to catch any water that might escape during the process. The bleed valve is typically located at the top side of the radiator and looks like a small square or hexagonal nut. Insert your radiator bleed key into this valve, ensuring a secure fit.
**Key Bleeding Techniques
![]() **
**
- Rotate the bleed key counterclockwise very slowly
- Listen for a hissing sound indicating air escaping
- Keep the valve slightly open until water starts to emerge
- Close the valve immediately once water flows consistently
As you bleed each radiator, pay attention to the water’s appearance. Initially, the water might look cloudy or contain small air bubbles. This is normal. Once the water runs clear and flows steadily without sputtering, you have successfully removed the trapped air.
Work systematically through your home, starting from the lowest floor and moving upwards. This approach ensures comprehensive air removal and prevents reintroducing air into already bled radiators. Take your time and be patient, as rushing can lead to incomplete air removal or potential system damage.
After completing the bleeding process, monitor your radiators over the next few days. Properly bled radiators should heat evenly and reach their full temperature quickly. If you notice continued cold spots or inconsistent heating, you might need to repeat the process or consult a professional heating engineer.
Remember that bleeding radiators is not just a maintenance task but an opportunity to improve your home’s heating efficiency and reduce unnecessary energy consumption.
Step 4: Check for Leaks and Repair Any Issues
Detecting and addressing leaks in your radiator system is a critical maintenance step that prevents potential long-term damage and ensures optimal heating performance. Learn more about comprehensive leak detection techniques.
Visual and Tactile Leak Inspection
Begin your inspection by carefully examining each radiator and connecting pipework for signs of moisture or corrosion. Warning signs include:
- Visible water droplets or wet patches around connections
- Rust-colored stains near pipe joints
- White calcium deposits suggesting long-term water seepage
- Unexplained damp areas on walls adjacent to radiators
Use a dry cloth to wipe around all connections, paying special attention to valve areas and pipe junctions. Subtle dampness might not be immediately apparent, so take your time and perform a thorough examination. Press gently around connections to check for any movement or potential weak points that could indicate developing structural issues.
Addressing Minor Leaks
For small leaks around valve connections, you might be able to resolve the issue using basic tools. Tighten valve nuts carefully using an adjustable wrench, applying gentle and consistent pressure. Avoid over-tightening, which could damage threading or create additional stress points. If tightening does not resolve the leak, you may need to replace the valve or seek professional assistance.
Some leaks result from worn valve packings or seals. In such cases, you can often replace these components without removing the entire radiator. Purchase replacement packings that match your specific radiator model, ensuring a precise fit. Apply PTFE tape to thread connections to create a more robust seal and prevent future leakage.
Pay particular attention to radiator valves, as they are common sources of potential leaks. Thermostatic and manual valves can develop wear over time, compromising their sealing capability. Inspect the valve body and spindle for signs of corrosion or damage that might prevent proper closure.
If you discover significant leaks, extensive corrosion, or feel uncertain about performing repairs, contact a professional heating engineer. Some issues require specialized knowledge and tools to address safely and effectively. Document any discovered problems with photographs, which can help professionals diagnose the issue more quickly during a follow-up inspection.
Remember that proactive leak detection and timely repairs can prevent costly water damage, reduce energy waste, and extend the overall lifespan of your heating system.
Step 5: Clean Radiators and Remove Dust Buildup
Dust and debris accumulation can significantly impair radiator performance, reducing heating efficiency and potentially compromising indoor air quality. Explore comprehensive heating system maintenance strategies to complement your cleaning efforts.
Comprehensive Cleaning Preparation
Gather specialized cleaning tools before beginning: a vacuum cleaner with a soft brush attachment, microfiber cloths, an extendable radiator brush, and a mild cleaning solution. Protective measures are crucial. Wear old clothing and consider using protective gloves to prevent dust contact with skin and minimize potential allergic reactions.
Methodical Dust Removal Technique
Start by turning off your heating system completely to prevent dust circulation. Begin with the vacuum cleaner, using its soft brush attachment to gently remove loose dust from the radiator’s exterior surfaces. Move methodically from top to bottom, ensuring you capture dust particles without scratching the radiator’s finish.
Pay particular attention to the spaces between radiator fins and panels, where dust tends to accumulate most densely. An extendable radiator brush can reach these challenging areas, allowing thorough cleaning without requiring uncomfortable physical contortions. Move the brush horizontally and vertically, dislodging trapped dust particles systematically.
Advanced Cleaning Considerations
For stubborn dust and grime, prepare a mild cleaning solution using warm water and a small amount of gentle detergent. Dampen a microfiber cloth slightly – remember, moisture should be minimal to prevent potential rusting or water damage. Wipe the radiator’s external surfaces carefully, avoiding electrical connections or valve mechanisms.
If your radiators have complex designs or hard-to-reach areas, consider using compressed air in short, controlled bursts to dislodge accumulated dust. Hold the can approximately 15 centimetres away from the surface and spray in short intervals to prevent moisture buildup.
Be particularly cautious with older radiators, which might have more delicate paintwork or vulnerable connections. Gentle cleaning techniques prevent inadvertent damage while maintaining the radiator’s structural integrity. After cleaning, use a dry microfiber cloth to remove any remaining moisture and prevent potential oxidation.
Once you complete the cleaning process, step back and inspect your work. A properly cleaned radiator should appear uniform in colour, free from visible dust accumulations, and ready to provide efficient heating. Regular maintenance like this can improve your heating system’s performance and potentially extend its operational lifespan.
Step 6: Test Radiator Performance and Adjust Settings
After completing comprehensive maintenance, testing your radiator system’s performance becomes crucial in ensuring optimal heating efficiency. This final evaluation step confirms the effectiveness of your previous maintenance efforts and identifies any remaining potential issues. Learn more about balancing heating systems for maximum comfort.
Systematic Performance Verification
Restart your central heating system and observe the radiators carefully during the initial warm-up cycle. Key performance indicators include:
- Consistent and uniform heat distribution across all radiators
- Rapid and even warming from bottom to top
- No unusual noises like banging, whistling, or gurgling
- Absence of cold spots or uneven temperature zones
Use a digital thermometer to measure temperature variations across different radiator sections. A well-functioning radiator should demonstrate a gradual, uniform temperature increase within approximately 10 to 15 minutes after system activation.
Detailed Temperature and Pressure Assessment
Carefully monitor each radiator’s temperature progression, paying special attention to valve functionality and heat distribution. Touch different sections of each radiator to verify consistent warming. The bottom of the radiator should heat first, gradually moving upwards, which indicates proper water circulation and absence of trapped air.
Check your system’s pressure gauge, typically located on the boiler. Normal pressure ranges typically fall between 1 and 1.5 bar when the system is cold. Significant deviations might suggest underlying issues such as water leakage or air accumulation that require further investigation.
If you detect temperature inconsistencies or persistent cold spots, you might need to repeat the bleeding process or adjust individual radiator valves. Some radiators feature thermostatic valves allowing precise temperature control, enabling you to balance heat distribution across different rooms.
Listen carefully during the initial heating cycle for any unusual sounds. Persistent knocking or banging might indicate potential issues with water pressure, air pockets, or pipe alignment. While some minor sounds are normal, consistent or loud noises warrant professional inspection.
Document your observations, noting any areas of concern or unexpected performance characteristics. This documentation can prove invaluable if you need to consult a professional heating engineer or track your system’s long-term performance.
Remember that thorough testing transforms routine maintenance into a proactive approach to home heating management, potentially preventing more significant issues and ensuring consistent, efficient warmth throughout your living space.
The following table provides an overview of each main maintenance step, with an estimated time frame and the key outcome you should expect.
| Step | Estimated Time | Key Outcome |
|---|---|---|
| Gather necessary tools and materials | 10–15 minutes | Preparation for safe and effective maintenance |
| Turn off heating and allow to cool | 30–45 minutes | Safe working temperature for radiator handling |
| Bleed radiators | 10–20 minutes each | Removal of trapped air, improved heat distribution |
| Check for leaks and repair | 15–30 minutes | Identification & fixing of minor leaks or weak points |
| Clean radiators and remove dust | 20–30 minutes | Dust-free radiators, better efficiency |
| Test radiator performance | 15–20 minutes | Even heat, no unusual noises, balanced system |
Keep Your Radiators Efficient and Your Home Warm with Thermatek
Tired of uneven heating, cold spots, and the worry of hidden leaks that disrupt your comfort? The article has highlighted the need for precise radiator maintenance using steps like bleeding air, checking for leaks, and regular cleaning. But sometimes even diligent DIY effort cannot cover every complex issue or guarantee lasting results, especially when you want to ensure safety and efficiency across your whole system.
Why settle for uncertainty when you can rely on proven professionals? At Thermatek Heating, our Gas Safe Registered engineers specialise in central heating performance and long-term reliability. We offer services such as comprehensive leak detection and expert heating system balancing to maximise comfort and energy savings. Book an inspection or maintenance visit with Thermatek today to protect your home from costly faults and get peace of mind for each heating season. Visit https://thermatekheating.co.uk and request your free quote now.
Frequently Asked Questions
How do I gather the necessary tools for maintaining my radiators in 2025?
To maintain your radiators efficiently, ensure you have an adjustable radiator bleed key, a digital thermometer, protective gloves, and basic screwdrivers. Start by collecting these tools to set a solid foundation for your maintenance process.
What should I do before starting radiator maintenance?
Before commencing maintenance, turn off your central heating system and allow the radiators to cool for about 30 to 45 minutes. This ensures safety and prevents scalding while you prepare your workspace.
How do I bleed my radiators to remove trapped air?
To bleed your radiators, use a radiator bleed key to slowly turn the bleed valve counterclockwise until you hear a hissing sound of escaping air. Keep the valve open until water flows steadily, then close it immediately, ensuring to check all radiators systematically from the lowest to the highest floor.
What are the signs of leaks in my radiator system?
Look for visible water droplets, rust stains, or damp patches around your radiators and pipes. If you notice any of these signs, inspect and tighten connections or replace faulty components immediately to prevent further damage.
How often should I clean my radiators to ensure efficient heating?
Regular cleaning of your radiators should be done at least once a year to remove dust and debris that can obstruct heat flow. Schedule this cleaning to coincide with the start of the heating season for optimal performance.
How can I test the performance of my radiators after maintenance?
After maintenance, restart your heating system and observe each radiator for even heat distribution within 10 to 15 minutes. If you find any cold spots or unusual noises, perform additional checks or adjustments as needed.