Complete Hot Water Cylinder Maintenance for 2025 Success
Hot water cylinder maintenance often sounds complicated, yet it is the hidden hero behind every warm bath and cosy morning routine. Most people expect their system to run for decades, but cylinders over 10 years old are much more likely to suffer efficiency losses and structural issues. Here’s the twist: with a few strategic checks, your cylinder can run better, cost less to operate, and keep surprises to a minimum all year round.
Table of Contents
- Step 1: Assess Your Hot Water Cylinder Condition
- Step 2: Gather Necessary Tools And Materials
- Step 3: Flush And Clean The Hot Water Cylinder
- Step 4: Inspect And Replace Insulation If Needed
- Step 5: Test Pressure Relief Valve Functionality
- Step 6: Document Maintenance And Schedule Next Check
Quick Summary
| Key Point | Explanation |
|---|---|
| 1. Assess the cylinder’s condition regularly | Conduct thorough inspections to identify any wear, corrosion, or leaks to maintain optimal performance. |
| 2. Gather proper tools and safety gear | Collect high-quality tools and protective equipment to ensure safe and effective maintenance action. |
| 3. Flush and clean the hot water cylinder | Regularly remove sediment and scale buildup to enhance efficiency and prevent bacterial growth in the system. |
| 4. Inspect and replace insulation as needed | Ensure insulation thickness meets modern standards to reduce energy costs and improve heating efficiency. |
| 5. Test and document valve functionality | Regularly check the pressure relief valve for smooth operation and maintain detailed records of maintenance activities. |
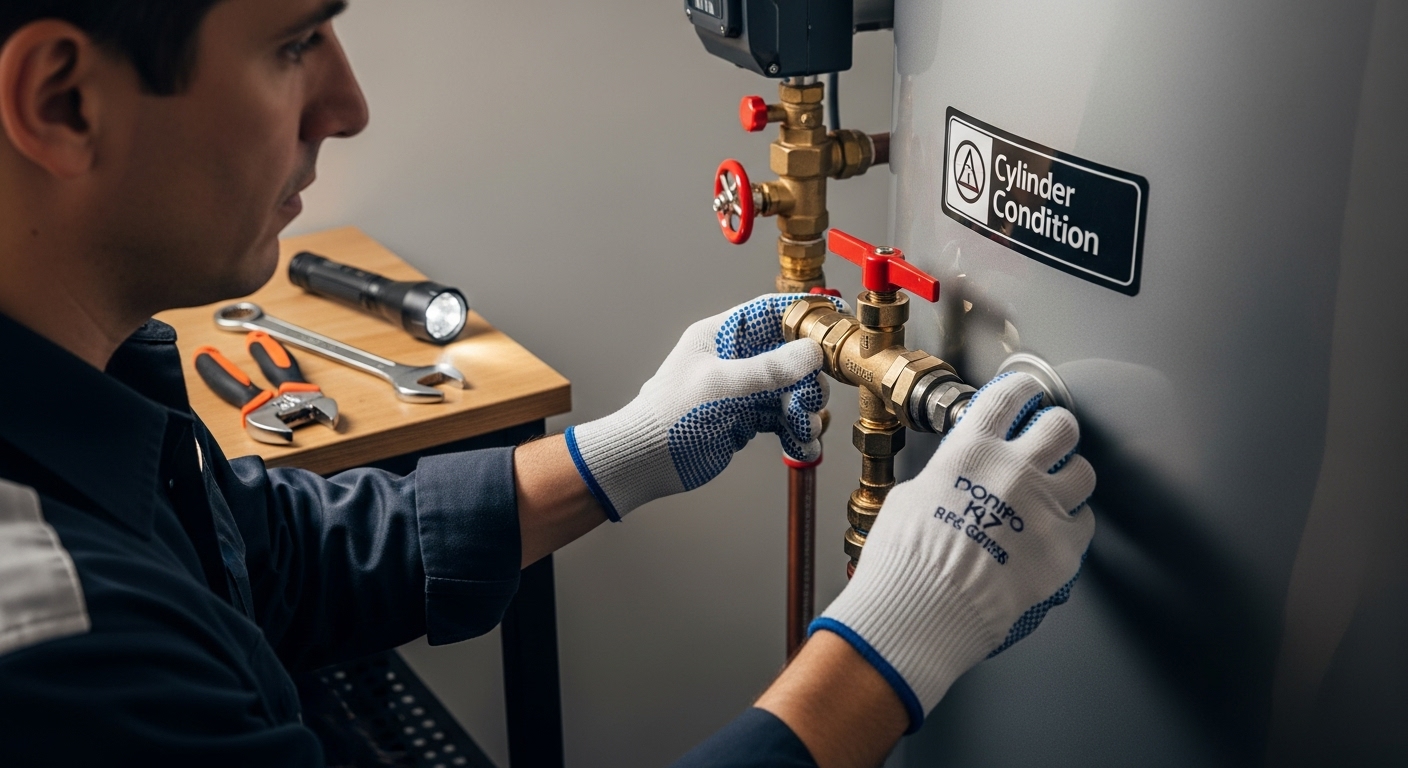
Step 1: Assess Your Hot Water Cylinder Condition
Successful hot water cylinder maintenance begins with a thorough and systematic assessment of your system’s current condition. This critical first step helps you understand potential issues, prevent costly repairs, and ensure optimal performance throughout the year.
Understanding Your Cylinder’s Current State
Starting your maintenance journey requires a comprehensive visual and functional inspection. Carefully examine your hot water cylinder for any visible signs of wear, corrosion, or damage. Look closely at external surfaces for rust spots, water stains, or unusual discolouration that might indicate underlying problems. Pay special attention to pipe connections, valves, and seals, checking for potential leakage or deterioration.
The age of your hot water cylinder plays a significant role in determining maintenance needs. Cylinders over 10 years old typically require more frequent and detailed assessments. Older systems are more prone to efficiency losses and potential structural weaknesses. During your inspection, note the cylinder’s manufacturing date and review its service history. If documentation is unavailable, consider consulting a professional heating engineer who can provide a detailed assessment.
Key Inspection Parameters
To conduct a comprehensive evaluation, focus on several critical parameters. Check the cylinder’s insulation integrity by feeling for temperature variations and looking for any visible damage to the insulation jacket. Examine pressure relief valves for smooth operation and listen for any unusual sounds when water flows. Inspect the anode rod if accessible, looking for significant corrosion which might indicate the need for replacement.
According to the Health and Safety Executive, maintaining appropriate water temperatures and system cleanliness is crucial for preventing potential health risks. Your assessment should include verifying that water temperatures can be safely maintained between 60-65 degrees Celsius to minimise bacterial growth while preventing scalding.
If you discover any concerning signs during your inspection such as significant corrosion, persistent leaks, or reduced efficiency, it is recommended to schedule a professional assessment. Professional heating engineers can provide detailed diagnostic services and recommend targeted maintenance or potential replacement strategies.
Step 2: Gather Necessary Tools and Materials
Preparing for hot water cylinder maintenance requires strategic planning and assembling the right equipment. This critical preparatory step ensures you can execute your maintenance tasks efficiently and safely, minimising potential disruptions and preventing unnecessary complications during the process.
Before beginning your maintenance work, gather a comprehensive set of professional-grade tools and protective equipment. Safety should always be your primary consideration. Start by selecting high-quality protective gear including insulated gloves, safety glasses, and non-slip footwear. These items protect you from potential electrical risks, hot surfaces, and unexpected water splashes during maintenance.
Your toolkit should include precision measuring instruments and specialised plumbing equipment. Essential tools include adjustable wrenches, pipe spanners, digital multimeter, pressure gauge, screwdriver set, and leak detection equipment. A thermal imaging camera can be particularly useful for identifying temperature variations and potential insulation issues. Consider investing in digital tools that provide accurate readings and help diagnose potential system problems with greater precision.
Additional materials you will need include thread tape, pipe sealant, cleaning cloths, descaling solution, and replacement components like washers and valve seals. Purchasing high-quality replacement parts specific to your hot water cylinder model is crucial. If unsure about compatibility, consult manufacturer specifications or seek professional advice from a heating engineer.
According to the UK government’s Approved Document G, maintaining proper tools and understanding their application is essential for ensuring system safety and compliance. Familiarise yourself with each tool’s specific function and handle them with care.
Before commencing maintenance, create a dedicated workspace with good lighting and ventilation. Lay down protective sheeting to catch any potential water spillage and keep your tools organised on a clean, stable surface. Ensure you have easy access to your cylinder and sufficient room to manoeuvre. Having a systematic approach to tool preparation will streamline your maintenance process and reduce the likelihood of unexpected challenges.
Below is a summary table of essential tools and materials needed for hot water cylinder maintenance, including their primary purpose and relevant notes to ensure proper preparation.
| Tool/Material | Purpose | Notes |
|---|---|---|
| Insulated gloves | Personal safety | Protects hands from heat and potential electrical hazards |
| Safety glasses | Eye protection | Shields eyes from water splashes and debris |
| Non-slip footwear | Personal safety | Prevents slips on wet surfaces |
| Adjustable wrench / pipe spanner | Loosening/tightening connections | Used for removing valves and pipes |
| Digital multimeter | Electrical testing | Checks for electrical safety on electric systems |
| Pressure gauge | Measuring system pressure | Ensures system is within safe operating limits |
| Screwdriver set | Component access | Opens panels and secures parts |
| Leak detection equipment | Identifies leaks | Pinpoints unnoticed leaks around pipework |
| Thermal imaging camera | Insulation assessment | Detects heat loss and insulation weaknesses |
| Thread tape / pipe sealant | Pipe sealing | Ensures leak-free reconnections |
| Cleaning cloths | General cleaning | Wipes surfaces and removes sediment |
| Descaling solution | Cylinder cleaning | Removes scale and mineral deposits |
| Replacement washers/valve seals | Component renewal | Essential for repairing minor leaks |
| Insulation jacket (as needed) | Thermal protection | Improves energy efficiency if old insulation is inadequate |
Step 3: Flush and Clean the Hot Water Cylinder
Flushing and cleaning your hot water cylinder represents a crucial maintenance step that eliminates sediment buildup, prevents bacterial growth, and ensures optimal system performance. This process removes accumulated minerals, scale, and potential contaminants that can compromise your water quality and heating efficiency.
Begin by completely shutting off the power supply to your hot water cylinder. For electric systems, switch off the circuit breaker, and for gas systems, turn the gas valve to the off position. Safety is paramount during this maintenance procedure. Next, locate the main water supply valve and close it to prevent water from refilling the cylinder during your cleaning process.
Connect a garden hose to the cylinder’s drain valve, ensuring a secure attachment that prevents leakage. Position the other end of the hose in an area that can safely handle the water discharge, such as a floor drain or exterior location. Open the drain valve slowly, allowing water to flow out gradually. This controlled drainage helps prevent sudden pressure changes that could potentially damage your system. As the water drains, you might observe sediment and mineral deposits, which is a clear indication of the necessity of this maintenance procedure.
Once the cylinder is completely drained, prepare a cleaning solution specifically designed for hot water systems. Avoid using harsh chemical cleaners that might damage internal components. Use a specialised descaling solution recommended by your cylinder manufacturer, mixing it according to precise instructions. Gently flush the interior using this solution, allowing it to circulate and break down any remaining mineral deposits or scale buildup.
According to the Health and Safety Executive, regular flushing is crucial for preventing bacterial growth and maintaining water system hygiene. After completing the cleaning process, thoroughly rinse the cylinder with clean water multiple times to ensure no cleaning solution remains.
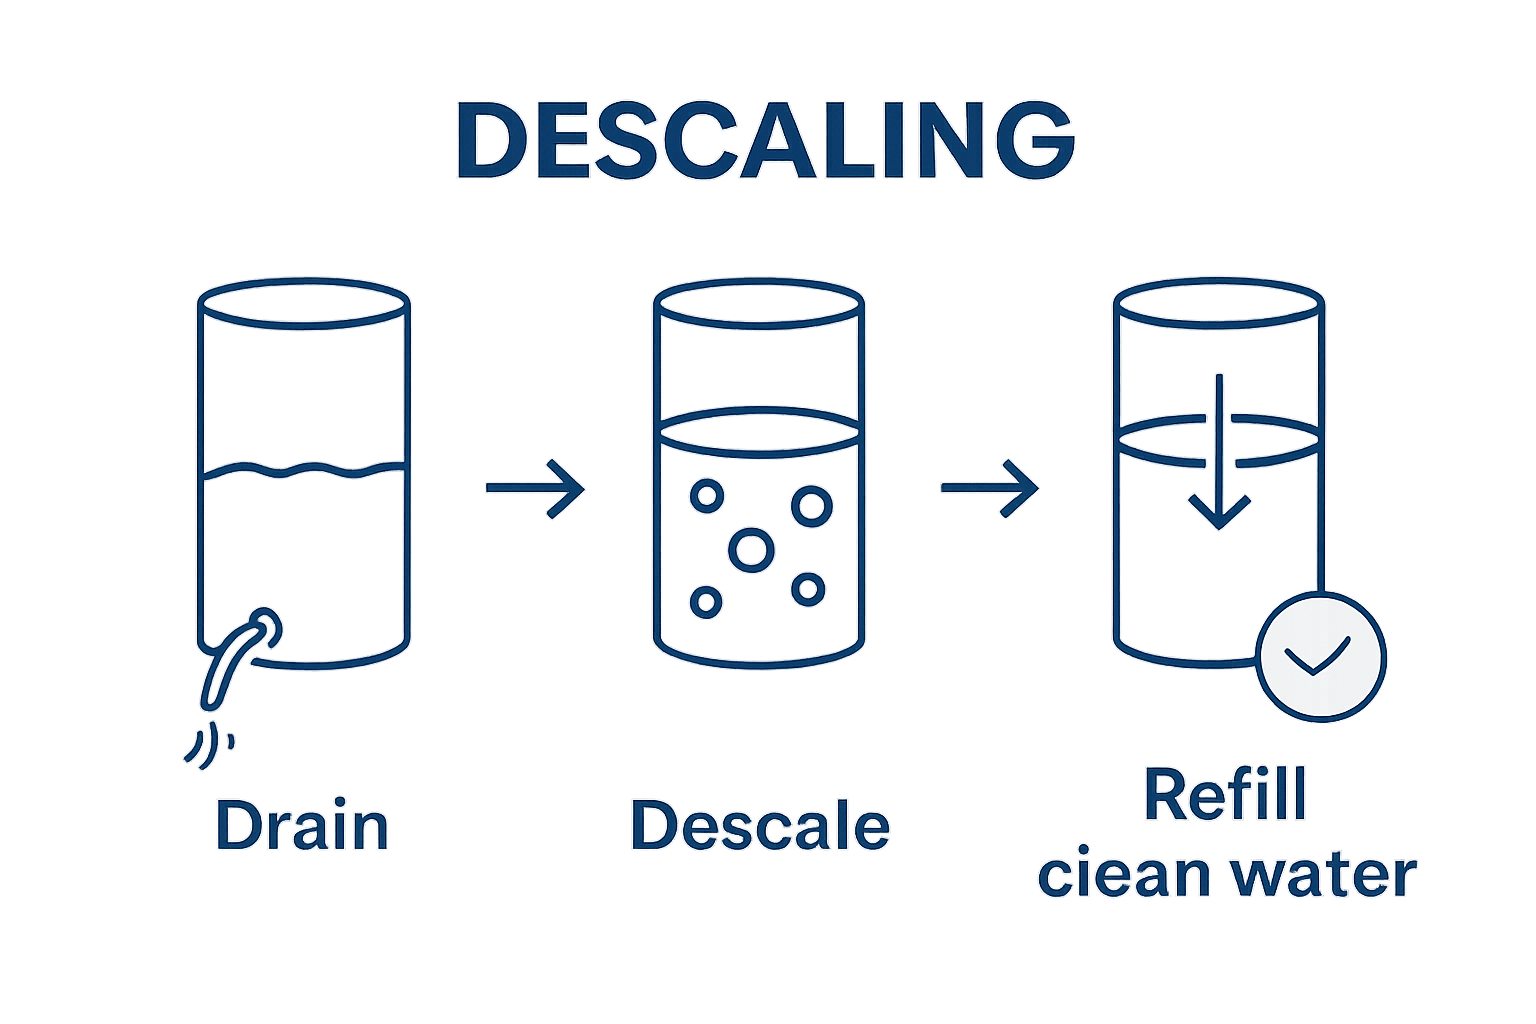 Reconnect all valves, restore water supply, and gradually refill the cylinder, checking carefully for any potential leaks during the refilling process.
Verify the system’s performance by restoring power or gas supply and monitoring water temperature and flow. A successful flush should result in clearer water, improved heating efficiency, and reduced risk of potential system complications. If you encounter any unusual sounds, inconsistent water temperatures, or persistent sediment, consider consulting a professional heating engineer for a more comprehensive assessment.
Step 4: Inspect and Replace Insulation if Needed
Proper insulation is the silent guardian of your hot water cylinder’s efficiency, protecting against unnecessary heat loss and reducing energy consumption. This critical maintenance step involves a comprehensive examination of your cylinder’s thermal barrier, ensuring it provides maximum protection and performance.
Visual inspection forms the foundation of effective insulation assessment. Begin by carefully examining the existing insulation jacket, looking for signs of wear, moisture damage, compression, or physical deterioration. Check for any tears, gaps, or areas where the insulation material has become thin or compressed. These imperfections can significantly compromise your cylinder’s thermal performance, leading to increased energy costs and reduced hot water efficiency.
Measure the thickness of your current insulation jacket. Modern recommendations suggest a minimum insulation thickness of 75mm to provide optimal thermal protection. Older installations might have thinner jackets that no longer meet current energy efficiency standards. If your existing insulation is less than 50mm thick or shows considerable signs of degradation, replacement becomes not just advisable but essential.
When selecting a replacement insulation jacket, prioritise materials specifically designed for hot water cylinders. Look for jackets with high thermal resistance ratings and made from durable, moisture-resistant materials. Foam-based and fibreglass jackets are popular choices, offering excellent heat retention properties. Ensure the new jacket fits snugly around your cylinder, covering the entire surface without leaving any exposed areas that could compromise thermal efficiency.
According to the Centre for Sustainable Energy, a well-installed insulation jacket can reduce heat loss by over 75%, potentially saving significant energy costs annually. During installation, pay careful attention to ensuring a tight, seamless fit. Secure the jacket using the provided straps or fastenings, eliminating any potential gaps that could reduce its effectiveness.
After installation, conduct a simple thermal efficiency test. Feel the exterior of the cylinder after several hours of heating. A properly insulated cylinder should feel only slightly warm to the touch, indicating minimal heat loss. If the surface feels excessively hot, it might suggest the need for additional insulation or professional assessment. Keep documentation of your insulation replacement, noting the date, material used, and thickness, which can be valuable for future maintenance and energy efficiency tracking.
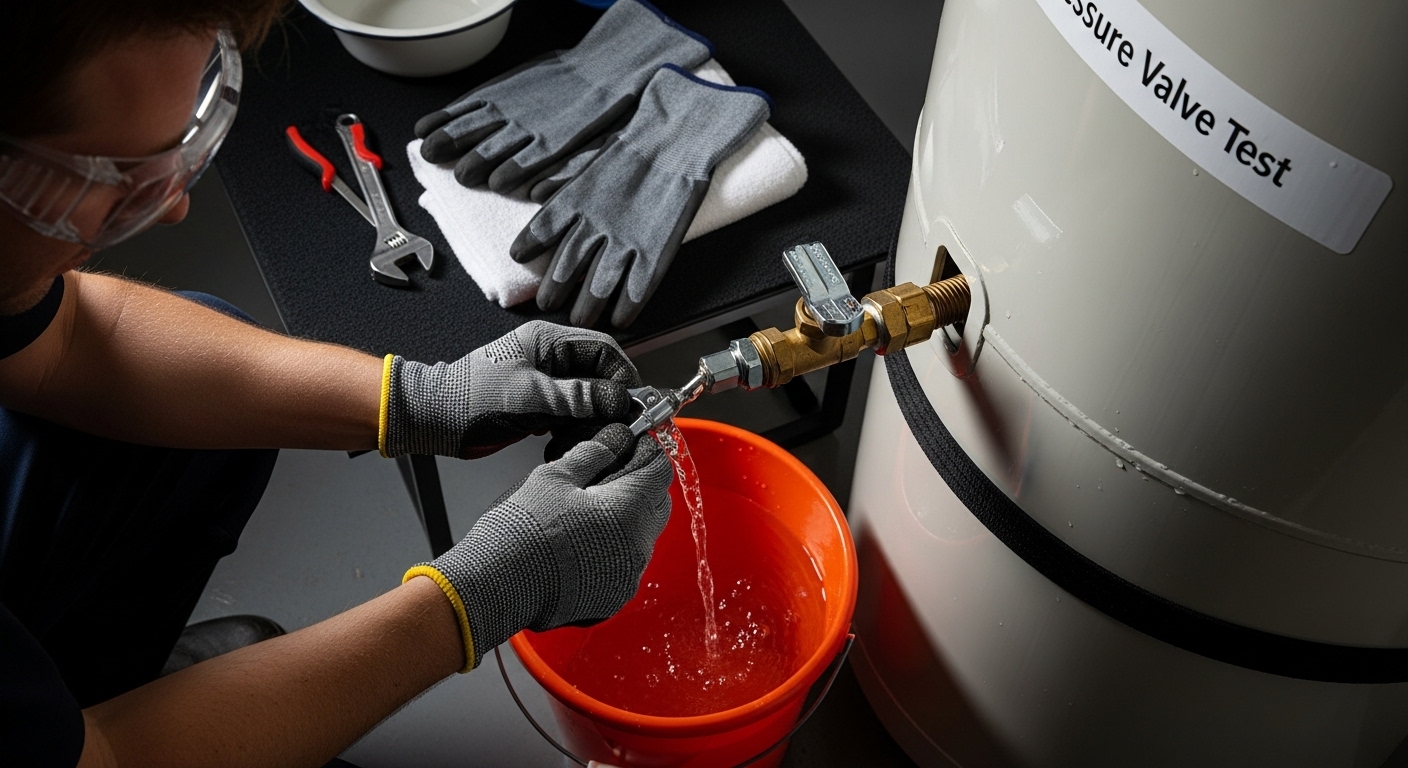
Step 5: Test Pressure Relief Valve Functionality
The pressure relief valve serves as a critical safety mechanism in your hot water cylinder, preventing potentially dangerous pressure buildup that could lead to system failure or catastrophic damage. This essential maintenance step involves carefully examining and testing the valve to ensure it operates correctly and provides reliable protection for your entire hot water system.
Safety preparation is paramount before beginning your valve functionality test. Start by wearing protective gloves and safety glasses, as the valve test might involve hot water discharge. Ensure you have a bucket or drainage area prepared to catch any water that might be released during the testing process. Position yourself carefully to avoid potential steam or hot water spray when manipulating the valve.
Locate the pressure relief valve, typically situated near the top or side of your hot water cylinder. This valve features a small lever or test handle that allows manual activation. Before testing, visually inspect the valve and surrounding pipework for any signs of corrosion, mineral buildup, or previous leakage. Check that the discharge pipe is clear and properly positioned to direct water safely away from electrical components or walking areas.
To conduct the test, slowly and deliberately lift the valve’s test lever. A functional pressure relief valve should release water smoothly and consistently, creating a clear, unobstructed flow. Listen carefully for any unusual sounds such as grinding, sputtering, or inconsistent water release. The water should flow freely and stop immediately when you release the lever. If you observe hesitation, partial blockage, or continuous dripping after releasing the lever, this indicates potential valve malfunction requiring professional intervention.
According to the Health and Safety Executive, regular testing of pressure relief valves is crucial for maintaining system safety. After completing the test, carefully wipe away any water and inspect the valve seat for debris or mineral deposits. If you notice persistent issues such as weak water flow, strange noises, or visible damage, do not attempt further repairs yourself. Contact a qualified heating engineer who can perform a comprehensive valve assessment and replacement if necessary.
Verification of a properly functioning pressure relief valve involves observing smooth operation, consistent water discharge, and immediate valve closure. Document the date of your test and any observations, which can help track the valve’s performance over time and provide valuable information for future maintenance or potential replacement.
Step 6: Document Maintenance and Schedule Next Check
Documenting your hot water cylinder maintenance represents the final and critically important stage of your service process. This systematic approach ensures you maintain a comprehensive record of your system’s health, performance, and future maintenance requirements, transforming sporadic maintenance into a strategic, proactive management strategy.
Create a dedicated maintenance logbook specifically for your hot water cylinder. This physical or digital record should capture every detail of your current maintenance session. Begin by recording the date of service, ambient temperature during maintenance, current cylinder age, and a detailed inventory of actions performed. Note specific observations such as water quality, insulation condition, valve functionality, and any unusual findings during your inspection. Include precise measurements like insulation thickness, water pressure readings, and temperature variations.
Photographic documentation can provide invaluable visual reference points for future maintenance. Take clear, well-lit images of your cylinder, focusing on areas of potential concern like valve connections, insulation condition, and any identified wear or corrosion. These visual records create a chronological timeline of your system’s condition, helping you track gradual changes that might not be immediately apparent during individual maintenance sessions.
Scheduling your next maintenance check is equally crucial. Most manufacturers recommend comprehensive hot water cylinder maintenance annually, though systems over ten years old might require more frequent inspections. Mark your next scheduled maintenance date in both your physical logbook and digital calendar. Set reminders at least one month in advance to ensure you have sufficient time to prepare tools, arrange professional assistance if needed, and allocate adequate time for a thorough inspection.
According to the Health and Safety Executive, maintaining comprehensive maintenance records demonstrates responsible system management. Consider developing a standardised checklist that covers all critical maintenance aspects. This template can include sections for visual inspection, performance testing, component condition, and recommended future actions. By creating a consistent documentation approach, you transform maintenance from a reactive task into a proactive system management strategy.
Finally, store your maintenance documentation in a secure, easily accessible location. Digital backups provide an additional layer of protection against potential physical document loss. These records not only help you track your hot water cylinder’s performance but can also prove invaluable for warranty claims, potential property sales, or professional assessments in the future.
This checklist helps ensure all key steps of hot water cylinder maintenance are completed and verified for optimal safety and efficiency.
| Maintenance Step | Verification Criteria | Complete (✓/X) |
|---|---|---|
| Visual inspection for wear and corrosion | No rust, stains, or leaks observed | |
| Age and documentation review | Cylinder age noted, service history checked | |
| Insulation jacket assessment | Minimum 75mm thickness, no visible damage | |
| Flushing and cleaning | Sediment removed, clear water upon refill | |
| Pressure relief valve test | Smooth water release, valve closes immediately | |
| Documentation completed | Logbook updated, photos taken | |
| Next maintenance scheduled | Date marked in calendar, reminders set |
Need Reliable Hot Water Cylinder Care? Choose Professional Expertise in Edinburgh and Midlothian
Home maintenance guides can take you far but there is no substitute for the confidence you gain from a fully qualified heating expert. If your inspection has revealed persistent leaks, unreliable hot water, or insulation problems, you are not alone. Many homeowners find the demands of safety checks, sediment flushing, and pressure valve testing can quickly become overwhelming. DIY methods often expose deeper issues that threaten your comfort and efficiency.
Imagine the peace of mind you will have with Gas Safe Registered engineers ensuring every aspect of your hot water cylinder is compliant, safe, and running at peak performance
Why leave your hot water supply to chance? Whether you discovered an ageing system, suspected corrosion, or are simply determined to prevent costly breakdowns, now is the time to put your maintenance in professional hands. Visit Thermatek Heating’s main site to request expert hot water cylinder maintenance, repairs, or upgrades. Enjoy the benefits of trusted local service, clear communication, and ongoing support from a team committed to energy-efficient results. Book your free quote today and take the next step towards reliable, year-round hot water security.
Frequently Asked Questions
What are the signs that my hot water cylinder needs maintenance?
Visible signs such as rust spots, water stains, corrosion, or unusual discolouration are indicators that your hot water cylinder may require maintenance. Reduced efficiency, persistent leaks, and unusual sounds when water flows are also important signals.
How often should I flush and clean my hot water cylinder?
It is recommended to flush and clean your hot water cylinder at least once a year. However, cylinders over 10 years old may benefit from more frequent cleaning to prevent sediment buildup and maintain efficiency.
What should I check during the pressure relief valve test?
During the test, ensure that the valve releases water smoothly and consistently when the test lever is lifted. Listen for any unusual sounds and ensure that water stops flowing immediately after releasing the lever. If you notice weak flow, unusual noises, or continuous dripping, consult a professional.
How can I improve the insulation of my hot water cylinder?
To improve insulation, visually inspect the existing jacket for wear, moisture damage, or compression, and replace it if it’s less than 50mm thick or shows deterioration. Choose high-quality materials designed for hot water cylinders to ensure optimal thermal protection.