
Essential Air Source Heat Pump Maintenance for Efficiency
Maintaining an air source heat pump might sound like a technical headache, but the truth is, even a little regular care can make a massive difference. Most people have no idea that regular cleaning and filter checks can extend a heat pump’s life by several years and help maintain its efficiency. Surprisingly, it is the simple steps at home—not just the annual visits from a professional—that keep these systems running smoothly while saving you money on repairs.
Table of Contents
- Step 1: Gather Necessary Tools And Materials
- Step 2: Turn Off The Power Supply Safely
- Step 3: Inspect And Clean The Outdoor Unit
- Step 4: Check And Replace Filters Regularly
- Step 5: Verify System Performance And Efficiency
- Step 6: Schedule Professional Inspections Annually
Quick Summary
| Key Point | Explanation |
|---|---|
| 1. Gather essential maintenance tools | Collect specific equipment like brushes, cloths, and vacuum cleaners for effective heat pump upkeep. |
| 2. Always turn off power before maintenance | Safely disconnect electrical supply to prevent hazards and protect the system during servicing. |
| 3. Regularly clean the outdoor unit | Inspect and clean the outdoor unit to maintain efficiency and prevent long-term damage. |
| 4. Replace air filters frequently | Clean or replace filters every 3-6 months to improve air quality and system performance. |
| 5. Schedule annual professional inspections | Hire qualified technicians for thorough annual assessments, enhancing system longevity and performance. |
Step 1: Gather Necessary Tools and Materials
Preparing for air source heat pump maintenance requires careful planning and the right equipment. Before diving into the maintenance process, homeowners must collect specific tools and materials that will ensure a safe and effective service. Proper preparation minimises potential damage and helps maintain the heat pump’s optimal performance.
The first step involves assembling a comprehensive toolkit designed specifically for heat pump maintenance. You will need several essential items to complete the task professionally. Your toolkit should include:
- Soft bristle brush for delicate cleaning
- Vacuum cleaner with soft attachment
- Protective work gloves
- Clean microfibre cloths
- Manufacturer’s maintenance guide
- Compressed air canister (optional)
According to the Energy Saving Trust, safety should be your primary consideration. Before beginning any maintenance, ensure the heat pump is completely powered off at the electrical circuit breaker. This crucial step prevents potential electrical accidents and protects both you and the equipment.
Carefully review your heat pump’s specific manufacturer documentation, as different models might have unique maintenance requirements. Some systems may need specialised cleaning solutions or have specific areas that require extra attention. Understanding these nuanced details prevents accidental damage and ensures you follow the manufacturer’s recommended maintenance protocols.
Your protective gear is equally important. Work gloves will shield your hands from potential sharp edges or dirt, while clean microfibre cloths will help you wipe surfaces without leaving residue. The soft bristle brush allows gentle removal of dust and debris from delicate components without causing scratches or mechanical damage.
By meticulously gathering these tools and preparing your workspace, you set the foundation for a successful air source heat pump maintenance session. The next steps will build upon this careful preparation, guiding you through a comprehensive service that maintains your system’s efficiency and longevity.
Below is a summary of essential tools and materials required for effective air source heat pump maintenance.
| Tool/Material | Purpose | Notes/Special Considerations |
|---|---|---|
| Soft bristle brush | Gentle cleaning of delicate components | Avoid hard bristles; prevents scratches |
| Vacuum cleaner with soft attachment | Removes loose dust and debris | Use a soft or brush attachment for safety |
| Protective work gloves | Shields hands from sharp edges and dirt | Wear during all cleaning steps |
| Clean microfibre cloths | Wipes surfaces without leaving residue | Use fresh cloths to avoid re-depositing dust |
| Manufacturer’s maintenance guide | Reference for model-specific requirements | Check for any unique procedures per model |
| Compressed air canister (optional) | Blows away dust from hard-to-reach areas | Use gently and with caution; optional item |
Step 2: Turn Off the Power Supply Safely
Before beginning any air source heat pump maintenance, safely disconnecting the electrical power is absolutely critical. This step protects you from potential electrical hazards and prevents accidental system damage during your maintenance procedure. Proper power isolation requires careful attention and methodical execution.
Locate your home’s primary electrical panel or circuit breaker box. This is typically situated in a utility room, garage, or basement. Identify the specific circuit breaker designated for your heat pump system. Most modern heat pump installations have a dedicated circuit breaker, usually labelled with terms like “heat pump” or “outdoor unit”.
According to the National Occupational Standards, safe electrical isolation involves a systematic approach. Begin by switching off the circuit breaker completely. This means moving the breaker switch fully to the “off” position. Do not simply reduce power or leave it in a mid-position.
After switching off the circuit breaker, perform a crucial verification step. Use a non-contact voltage tester near the heat pump’s electrical connections to confirm zero electrical current. This additional check provides an extra layer of safety, ensuring no residual electricity remains in the system.
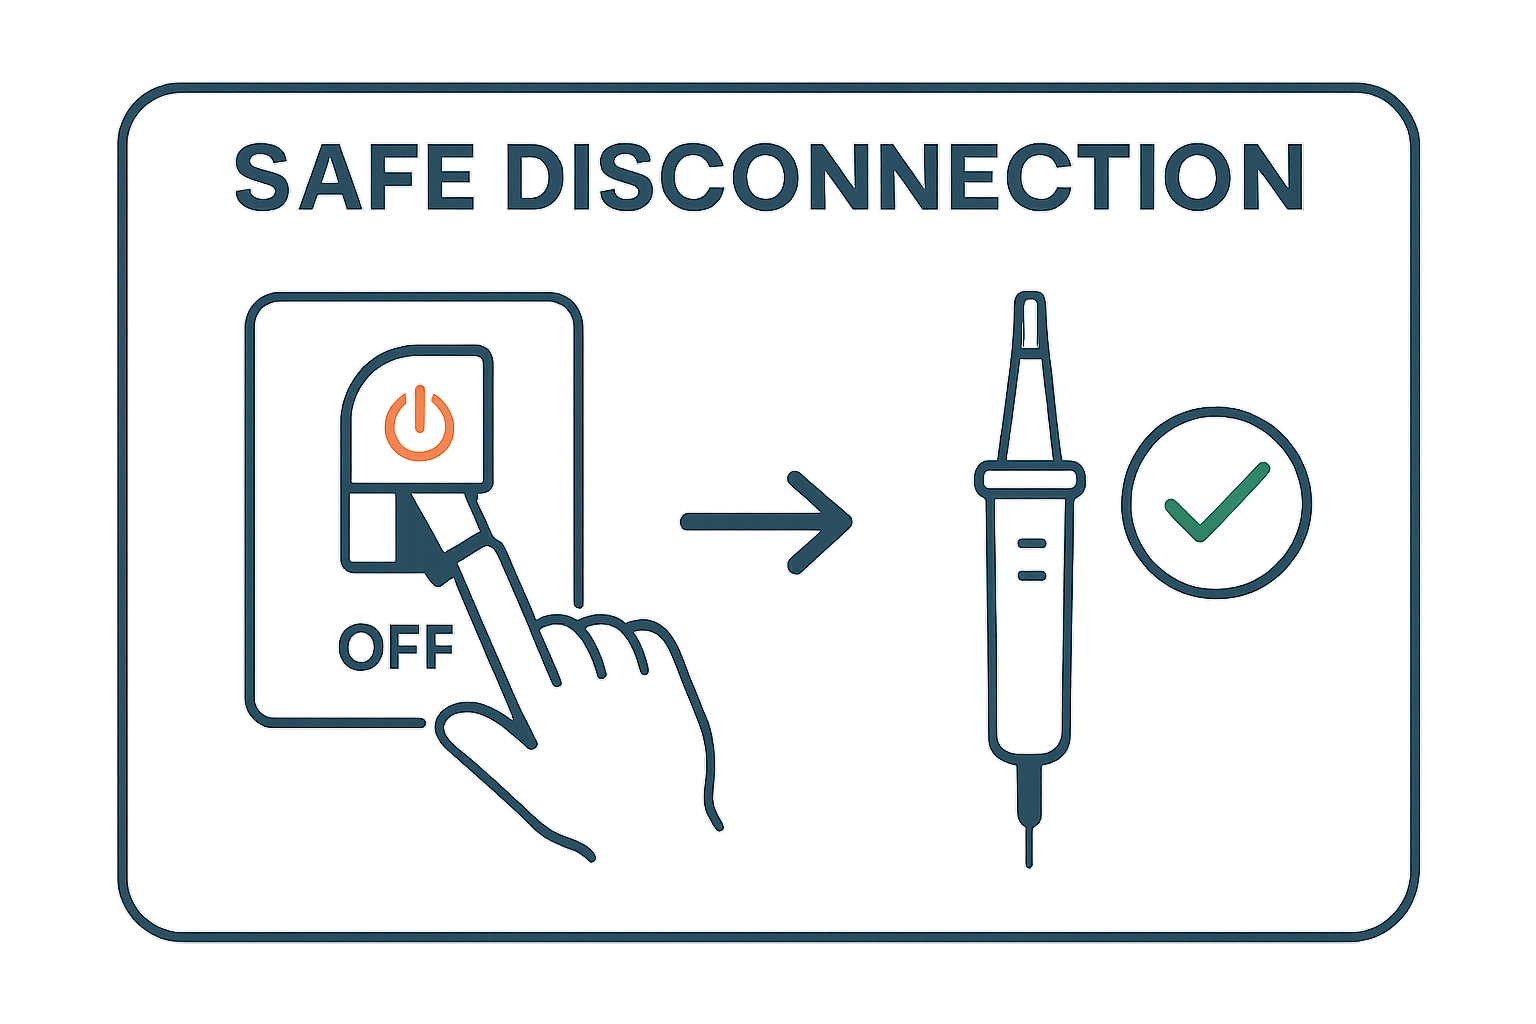 Remember: never assume a circuit is dead without proper testing.
If you are uncertain about identifying the correct circuit breaker or lack confidence in electrical safety procedures, consult a professional heating engineer. Some heat pump systems might have multiple power feeds or complex electrical setups that require specialised knowledge.
Once you have confirmed the power is completely off, place a temporary warning tag or piece of tape on the circuit breaker. This simple action prevents accidental re-energisation while you are working on the system. Your warning tag should clearly indicate that maintenance is in progress and the circuit should not be switched on.
By meticulously following these power isolation steps, you create a safe working environment for your heat pump maintenance. The next stages of your maintenance process can now proceed with significantly reduced risk of electrical accidents or system damage.
Step 3: Inspect and Clean the Outdoor Unit
The outdoor unit of an air source heat pump is continuously exposed to environmental elements, making regular inspection and cleaning fundamental to maintaining system efficiency. This critical maintenance step ensures optimal performance and prevents potential long-term damage.
Begin by carefully examining the entire exterior of the outdoor unit. Look for any visible signs of damage, such as dents, cracks, or corrosion on the unit’s casing. Pay special attention to the surrounding area, checking that no vegetation has grown too close or that no debris has accumulated around the unit’s base.
According to Changeworks, annual checks are crucial for maintaining system performance. Using your soft bristle brush, gently remove any accumulated dirt, fallen leave, or debris from the unit’s exterior and around its base. Be particularly careful around the air intake grill and evaporator components.
Your cleaning process should be methodical and gentle. Start by using the soft brush to loosen any loose dirt or debris. Follow this with your vacuum cleaner’s soft attachment to remove the loosened particles. Avoid using high-pressure water or harsh cleaning chemicals, as these can damage the delicate components of the heat pump.
Inspect the unit’s fins carefully. These thin metal pieces can easily become bent or damaged, which impacts the heat pump’s efficiency. If you notice any bent fins, use a fin comb (available at most hardware stores) to carefully straighten them. Work slowly and gently to avoid causing additional damage.
Check the drainage areas and condensate lines to ensure they are clear and unobstructed. Any blockages can lead to water buildup and potential system issues. Look for signs of water staining or unusual moisture around the unit that might indicate drainage problems.
Once you have completed the cleaning, step back and do a final visual inspection. The outdoor unit should look clean, with no visible debris and no signs of damage or unusual wear. Ensure there is at least 30 centimetres of clear space around the unit to allow proper air circulation. This final verification step confirms that your maintenance has been thorough and effective, setting the stage for the next phase of your air source heat pump service.
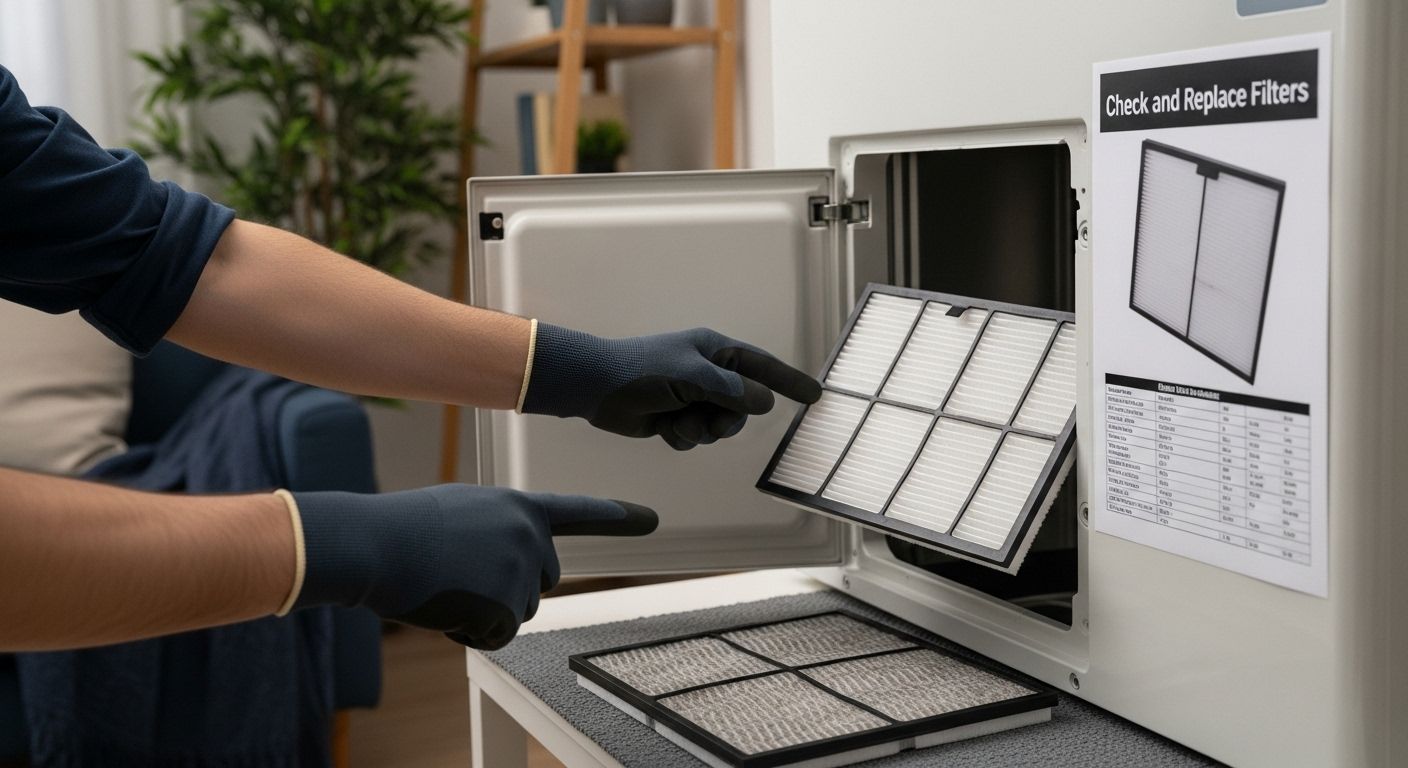
Step 4: Check and Replace Filters Regularly
Filter maintenance is a critical component of air source heat pump efficiency, directly impacting system performance and indoor air quality. Clean filters are the first line of defence against dust, debris, and potential system inefficiencies. Neglecting this simple maintenance task can lead to reduced heating performance and increased energy consumption.
Begin by locating the air filters in your heat pump system. Most units have filters positioned in the indoor air handling unit or return air grille. Carefully remove the filter cover, taking care not to damage any surrounding components. Inspect the filter thoroughly, looking for visible signs of dirt accumulation, discolouration, or physical damage.
The frequency of filter replacement depends on several factors, including environmental conditions, usage, and manufacturer recommendations. Generally, most residential heat pump systems require filter replacement or cleaning every three to six months. Homes with pets, high dust levels, or frequent cooking may need more frequent filter changes.
Carefully remove the old filter, noting its exact size and type. Take a clear photo or make a note of the filter specifications to ensure you purchase the correct replacement. When handling used filters, wear protective gloves and avoid shaking them, as this can release trapped dust and allergens into the air.
If the filter is a washable type, clean it carefully using lukewarm water and a mild detergent. Allow the filter to dry completely before reinstalling. For disposable filters, simply discard the old one and install a new, matching filter. Ensure the filter is inserted in the correct orientation, paying attention to any directional arrows indicating airflow direction.
While replacing the filter, take a moment to inspect the filter housing. Clean any dust or debris from the surrounding area using a soft cloth or vacuum cleaner with a soft attachment. A clean filter housing helps maintain optimal airflow and system efficiency.
Finish by securely replacing the filter cover, ensuring it fits snugly without any gaps. Perform a quick system check to confirm everything is properly seated. Signs of a successful filter replacement include smooth airflow, no unusual noises, and a general sense of improved air quality.
Regular filter maintenance is a simple yet powerful way to extend the life of your air source heat pump, improve energy efficiency, and maintain a healthy indoor environment. Mark your calendar or set a reminder to check and replace filters consistently, transforming this task into a reliable part of your home maintenance routine.
Step 5: Verify System Performance and Efficiency
After completing the previous maintenance steps, verifying your air source heat pump’s overall performance and efficiency becomes crucial. This final diagnostic process ensures that all your maintenance efforts have optimised the system’s functionality. Systematic performance verification helps identify potential issues before they escalate into costly repairs.
Start by powering the system back on and allowing it to run through a complete heating cycle. Listen carefully for any unusual sounds that might indicate mechanical problems. Normal operation should involve smooth, consistent airflow with minimal noise. Pay attention to how quickly the system reaches the desired temperature and maintains it.
According to the UK Government’s Air Conditioning Inspection Guidelines, regular performance assessments are essential for maintaining system efficiency. Monitor your heat pump’s energy consumption using either the integrated display or your home’s energy monitoring system. Compare current energy usage with previous bills to determine if the maintenance has improved overall efficiency.
Check the thermostat settings and ensure they respond correctly to temperature adjustments. Verify that the heat pump switches between modes smoothly and maintains consistent temperature levels. A well-functioning system should adapt quickly to temperature changes without significant lag or excessive cycling.
Inspect the refrigerant levels, though this might require professional equipment. Signs of potential refrigerant issues include reduced heating performance, ice formation on external units, or unusual hissing sounds. If you suspect refrigerant problems, contact a professional heating engineer for a detailed assessment.
Make a detailed record of your observations. Note the date of maintenance, any components replaced, and your performance findings. This documentation becomes valuable for future maintenance sessions and can help track the system’s long-term performance trends.
Finally, clean up your workspace and ensure all protective covers and panels are securely replaced. Your comprehensive maintenance routine has not only preserved the heat pump’s efficiency but also extended its operational lifespan. Regular, thorough maintenance like this prevents unexpected breakdowns and maintains optimal home heating performance.
Step 6: Schedule Professional Inspections Annually
Despite your diligent personal maintenance efforts, professional annual inspections remain a critical component of comprehensive air source heat pump care. These expert assessments provide a deep diagnostic review that goes beyond routine homeowner maintenance, uncovering potential issues before they transform into expensive repairs.
Begin by researching qualified heating engineers specialising in air source heat pump systems. Look for professionals with specific credentials such as Gas Safe Registration and manufacturers’ specific certifications. Recommendations from the manufacturer or local heating associations can guide you towards reputable technicians.
According to UK Government Guidance, professional inspections are crucial for maintaining system efficiency. When scheduling your annual inspection, prepare documentation about your heat pump’s model, previous maintenance records, and any performance observations you’ve noted during your personal maintenance checks.
A comprehensive professional inspection typically involves several critical assessments. The technician will conduct a thorough examination of electrical connections, refrigerant levels, system pressures, and mechanical component conditions. They will use specialised diagnostic equipment to measure system performance metrics that are not accessible through standard homeowner maintenance.
During the inspection, request a detailed report outlining the system’s current condition. This documentation serves multiple purposes: it provides a professional assessment of your heat pump’s health, identifies potential future maintenance requirements, and creates a historical record of the system’s performance over time.
Financial planning is an important consideration. Professional inspections represent an investment in your heating system’s longevity. While the cost might seem unnecessary, these annual check-ups can prevent significant repair expenses by identifying and addressing minor issues before they escalate.
Ensure the inspection includes comprehensive testing of all system components, including electrical systems, mechanical parts, refrigerant levels, and overall energy efficiency. A high-quality professional inspection goes beyond a simple visual check, providing a holistic assessment of your air source heat pump’s operational status.
By consistently scheduling these annual professional inspections, you transform your approach from reactive maintenance to proactive system management. This strategy ensures your air source heat pump continues operating at peak efficiency, delivering reliable heating while minimising unexpected breakdowns and extending the system’s operational lifespan.
Use the following table as a step-by-step overview of the main maintenance tasks, including their estimated difficulty and key outcomes.
| Step | Estimated Difficulty | Key Outcome |
|---|---|---|
| Gather necessary tools and materials | Easy | Prepared and safe workspace for maintenance |
| Turn off the power supply safely | Medium | Safe environment, electrical hazards eliminated |
| Inspect and clean the outdoor unit | Medium | Debris removed, optimal airflow, external unit protected |
| Check and replace filters regularly | Easy | Improved air quality and system performance |
| Verify system performance and efficiency | Medium | Ensures recent maintenance improved operation |
| Schedule professional inspections annually | Medium | Deep diagnostic assessment, preventative maintenance |
Secure Lasting Efficiency for Your Air Source Heat Pump
Do you feel uncertain about maintaining your air source heat pump at its best? This article highlights how missed maintenance or incorrect steps can result in lost efficiency, higher bills and unexpected repairs. If you worry about safely inspecting components or feel unsure when it is time for professional help, you are not alone. Many homeowners struggle to keep up with the details of regular filter changes, outdoor unit cleaning and annual safety checks. You deserve peace of mind and lasting warmth in your home, no matter what the Scottish weather brings. If you want your heat pump to deliver maximum efficiency and reliable comfort all year, the right specialist makes all the difference.
Let Thermatek’s Gas Safe Registered engineers take the stress out of your heat pump maintenance. Enjoy the confidence of comprehensive care, from routine inspections right through to urgent repairs and system upgrades. See what sets us apart in Edinburgh and Midlothian by visiting our main website or hear directly from our satisfied clients on the customer testimonials page. Schedule your next maintenance visit now and avoid costly breakdowns in the future. Reach out for a free quote today and keep your heat pump running smoothly all year round.
Frequently Asked Questions
What tools are needed for air source heat pump maintenance?
You will need a soft bristle brush, a vacuum cleaner with a soft attachment, protective work gloves, clean microfibre cloths, the manufacturer’s maintenance guide, and optionally a compressed air canister.
How often should I check and replace my heat pump filters?
Filters should be checked and replaced or cleaned every three to six months. Homes with pets or high dust levels may require more frequent changes.
Why is it important to turn off the power supply before maintenance?
Turning off the power supply ensures safety by preventing electrical hazards and accidental damage to the heat pump during maintenance.
What are the signs that my air source heat pump needs professional inspection?
Signs include unusual sounds during operation, reduced heating performance, ice formation on the outdoor unit, or irregularities in airflow. If you notice these issues, it’s best to consult a heating engineer.